The advantage of using an ASIO SOUND CARD when using your paddles with a software cw keyer on your computer
A simple test was setup to determine how much latency there was,
from the time you tap one of the paddle handles,
until you actually hear the sidetone from your speaker or headphones,
when using two different approaches to computer audio.
- DIRECT SOUND was compared to ASIO -
(with the BEHRINGER UCA222)
DIRECT SOUND - took over 100 milliseconds
ASIO - took less than 30 milliseconds
Using an ASIO SOUND CARD reduces latency substantially to the point where it would be considered NEAR ZERO LATENCY - at less than 30 milliseconds.
DIRECT SOUND is not ideal therefore, at over 100 milliseconds; and potentially will be an obstacle and hindrance to sending precision morse code with your paddles and a software cw keyer application.
NOTE: the behringer uca222 is a budget asio sound card
and costs around 30 dollars.
http://www.amazon.com/Behringer-UCA222-U-Control-Ultra-Low-Download...
Views: 6916
-
Comment by Chuck aa0hw on January 22, 2013 at 5:55am
-
Since MORSE KEYER at this time does not have an ASIO CONTROL tab, you need to use another program to bring up the ASIO SETTINGS screen, and set the SYSTEM PERFORMANCE to at least - FAST - or higher. This is important to lower the sound cards latency as low as possible depending on your individual computer. The sample rate comes default at 44100. Selecting 48000 may offer even lower latency but I did not test this

-
-
The program that I used to bring up the BEHRINGER's ASIO settings is called PEDALBOARD2. Below is a screenshot of this. Just go to the menu and select - OPTIONS - then select - AUDIO SETTINGS -

-
-
HOW TO USE THIS SETUP TO KEY YOUR RIG
1. We will use the LINE IN jacks of the BEHRINGER to receive the audio output from the RIG. Run an audio cable from your RIG's audio output to the LINE IN jacks of the BEHRINGER. -might be a good idea to use an audio cable that includes a ground loop isolating transformer like THIS
2. We will use the "always on" headphone jack of the BEHRINGER to run another audio cable to an audio derived cw keying switch circuit to key the rig. All MORSE KEYER audio tones will then be going to both your computer sound card AND an audio derived cw keying circuit to key your rig at the same time.
3. We will use PEDALBOARD2 to transfer the audio from the LINE IN jacks of the BEHRINGER over to the sound card on your computer that you are using to hear all audio from this setup. You will hear the audio output from your rig then, on your computer sound card and also be able to apply some DSP plugins to clean up the audio or keep watch over it - for more info see - HERE
HERE IS A PICTURE OF PEDALBOARD SETUP FOR TRANSFERRING AUDIO FROM RIG TO SOUNDCARD
-
-
The free DSP plugins show above on PEDALBOARD2 are from REAPER's REAPLUGS. They are free to download from HERE . Once downloaded and installed, you have to go into the options menu of PEDALBOARD2 and re-scan for new plugins. There are many free VST PLUGINS available in addition to REAPLUGS. PEDALBOARD2 is one of the easiest and best of the free VST HOSTS that I have tested.
-
-
Here is a device for @20 $, that already has a stereo iambic paddle jack ready to go - you just plug your iambic paddle cable right into this serial port interface and plug the interface into your serial com port.
FROM: http://www.amateurradioproducts.com/

-
-
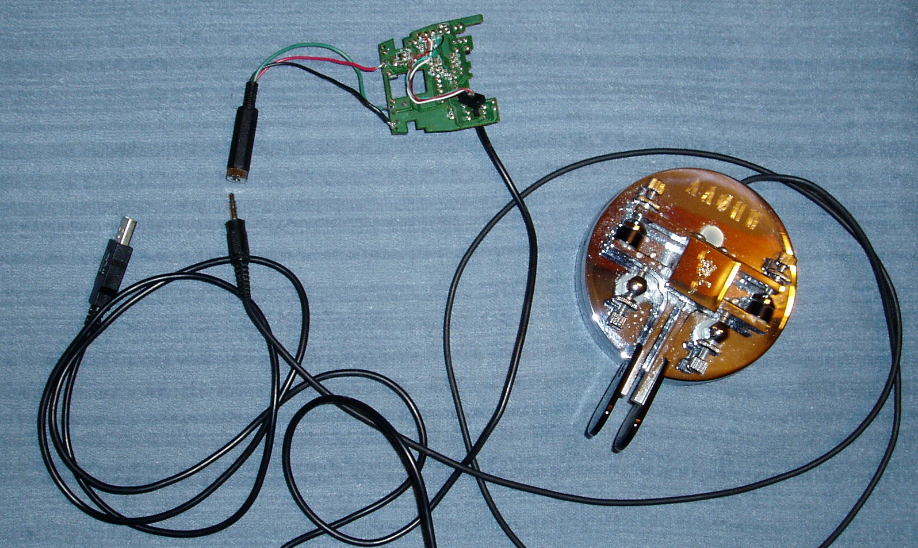
- Here is how I connected my paddles to a spare usb mouse for use with Morse Keyer -
If you do not have a serial port or USB2SERIAL port adapter, no worries, you can still use MORSE KEYER with your mouse. Just place your mouse cursor inside the blue Mouse Keying Area square on the MORSE KEYER GUI SCREEN, and then your mouse buttons will act just like an iambic paddle - one mouse button for the dits, the other for the dahs...etc... i have even used a wireless mouse with my laptop for an ultra portable solution to emulate an iambic paddle this way... here is a picture of that:
Even better, is to modify a spare USB MOUSE. Then you can connect your paddle directly to the mouse circuit board. One wire per side is soldered to the left and right mouse button micro switch(hot lead) and a third wire is soldered to the ground on the mouse circuit board. Solder the other ends of the three wires to a stereo 1/8 inch female jack. Plug in your paddles and you're ready to send cw with Morse Keyer by placing your mouse cursor inside the blue square - Mouse Keying Area - click on picture to enlarge -
-
-
Here is a closer look at using a spare USB MOUSE to modify and be able to hook up your paddles directly to it
- Here is a way to use a spare USB MOUSE and plug your iambic paddles directly into it -*************************************************************************************************************************open up the mouse and take out the circuit boardsolder wires to the "hot leads" of both microswitches and the mouse circuit board groundconnect these wires to a stereo female 1/8 inch plug plug in this usb mouse and allow WINDOWS OS, to install the drivers for itonce the install is finished, place your mouse cursor in theblue mouse keying area square of MORSE KEYER
connect the wires from your iambic paddle to a male stereo 1/8 inch audio plug
dit side of the paddle - to connect to one of the micro switch "hot leads"
dah side of the paddle - to connect to the other micro switch "hot lead"
ground of the paddle - to connect to the mouse circuit board ground

this USB mouse will not effect the mouse cursor movement
use your other computer mouse to move the cursor to and from the
MORSE KEYER mouse keying area/MORSE KEYER program
NOTE: by using an ASIO SOUND CARD, and direct monitoring, as specified in the first post in this topic, there is no noticeable latency/delay from tapping your iambic paddle handles, until you hear your own sidetone
-
-
WASAPI MODE
Recently a new version of EHOcw was published that now has WASAPI MODE as an option
A new set of tests were run to see how well WASAPI MODE does as a software keyer with paddles
- Using a USB SOUND CARD in WASAPI mode VS using your native motherboard computer sound card -
- A USB SOUND CARD IN WASAPI MODE ADDS AN EXTRA 30 milliseconds -
the delay of the motherboard REALTEK HD sound card was 55ms from paddleSLAP to hearing the tone
the delay of the usb sound card BEHRINGER UCA222 was 85ms from paddleSLAP to hearing the tone
below is a blended view of the two graphs - both using WASAPI
BEHRINGER UCA222 - WASAPI MODE - on top
REALTEK HD AUDIO - WASAPI MODE - on bottom
WASAPI MODE
Using WASAPI MODE is possible if your software cw keyer has WASAPI MODE available as an option. The new version of ehoCW has WASAPI MODE. Test your paddle keying and see if you also find that it is very easy to send good cw with @55ms of delay from paddle tap to hearing the sidetone.
-
-
If you get extra dits or stray dashes or weird combos of characters that you did not send, try this HINT:
Use 220,000 ohm resistors to drain off the voltage buildup from the total capacitance in a serial port setup.
Connect a 220,000 ohm resistor from both the dit and dah paddle connections to the DTR pin to drain off the voltage from any wire harness or paddle contact voltage/capacitance build up. This will help prevent "stray" dits or dahs from being sent from the voltage/capacitance that accumulates from all the cables, and wiring, and paddle contact surfaces.
Comment
- ‹ Previous
- 1
- 2
- Next ›
© 2024 Created by Chuck aa0hw.
Powered by
![]()
You need to be a member of QRQcw to add comments!
Join QRQcw